Getting Started
Opening the Plugin
After installation, find Plot by Revision on the Add-Ins tab in Revit's ribbon. Click the button to open the main dialog.
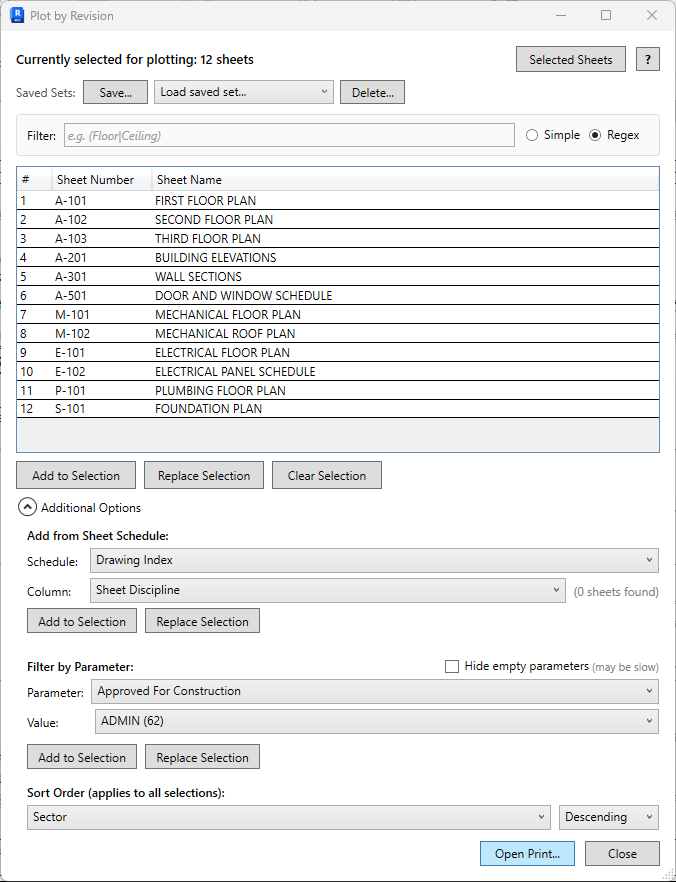 The Plot by Revision dialog showing revisions, filters, and selection tools
Interface Overview
The dialog is organized into several areas:
- Filter bar (top): Text search to filter revisions by sheet number or name
- Revision list (center): All project revisions with sheet counts
- Expandable sections: Add from Sheet Schedule, Filter by Parameter, Saved Sets
- Selection actions (bottom): Add to Selection, Replace, Clear, sort options, and Open Print
Basic Workflow
- 01Select revisions: Check one or more revisions in the list to see their associated sheets
- 02Add to print selection: Click "Add to Selection" to add those sheets to Revit's print queue
- 03Repeat or refine: Use filters, schedules, or parameters to add more sheets
- 04Print: Click "Open Print..." to apply changes and open Revit's Print dialog
Plot by Revision works with Revit's in-session print selection. It never creates or modifies saved View/Sheet Sets, keeping your project clean.
Text Filter
The filter bar at the top of the dialog lets you quickly narrow down the revision list. Type to search sheet numbers and names within each revision.
 The text filter with mode toggle and random example placeholders
Filter Modes
| Mode | Description | Examples |
|---|---|---|
| Simple | Wildcard matching with * and ? | A-1*, *Floor*, M-?01 |
| Regex | Full regular expression support | ^A\d{3}, (Floor|Ceiling) |
Simple Mode Wildcards
*: Matches any number of characters?: Matches exactly one character
The filter box shows example patterns as placeholder text. The examples change randomly to help you discover patterns.
Revision Selection
The main view shows all revisions in your project with key information:
 The revision list with sequence, date, description, issued status, and sheet counts
| Column | Description |
|---|---|
| Checkbox | Select revisions to include their sheets |
| Seq | Revit's sequence number for the revision |
| Date | Revision date as entered in Revit |
| Description | Revision description text |
| Issued | Whether the revision has been marked as issued |
| Sheets | Number of printable sheets with this revision |
Revision Filter Modes
Use the radio buttons to filter which sheets are counted and included:
- All: Sheets with any type of revision (clouds or manually activated)
- Clouds Only: Only sheets that have physical revision clouds drawn on them
- Manual Only: Only sheets where the revision was manually activated (no clouds)
Use "Clouds Only" to limit to sheets with physical revision clouds. Use "Manual Only" for sheets where the revision was manually activated without clouds.
Viewing Selected Sheets
Click the "Revisions / Selected Sheets" toggle button to switch between views:
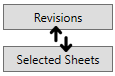 Toggle button to switch between views
- Revisions view: Shows the revision list (default)
- Selected Sheets view: Shows all sheets currently in your print selection with row numbers
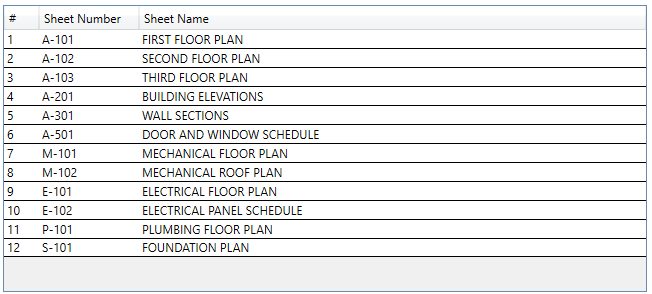 Selected Sheets view displays your current print queue with row numbers
The Selected Sheets view is useful for reviewing what's currently in your print selection before sending to print.
Reordering Sheets
In the Selected Sheets view, you can drag and drop sheets to reorder them:
- Click and drag a sheet to move it to a new position
- Select multiple sheets (Ctrl+Click or Shift+Click) and drag them together
- A visual indicator shows where sheets will be inserted
Column Options
Access column settings using either method:
- Gear icon: Click the gear icon (visible in Selected Sheets view)
- Right-click: Right-click any column header (works in empty header space too)
Available options:
- Rev column: Show/hide the current revision mark
- Rev Date column: Show/hide the revision date
- Rev Description column: Show/hide the revision description
- Add Parameter Column...: Add any sheet parameter as a custom column
- Auto-Hide Empty Columns: Automatically hide custom columns with no values
- Remove Column: Remove custom parameter columns via submenu
Column Widths & Order
Resize columns by dragging the column borders. Reorder columns by dragging column headers. Both column widths and order are saved between sessions.
Press Ctrl+Double-Click on any column header to auto-size all columns to fit their content.
Large Sheet Lists
For performance, if your selection contains more than 1000 sheets, the view initially shows the first 750 sheets. Click the "Show All" button to display the complete list.
Adding Sheets
Once you've selected revisions, use the action buttons at the bottom to manage your print selection.
 Add to Selection, Replace Selection, and Clear Selection buttons
| Button | Action |
|---|---|
| Add to Selection | Add sheets from checked revisions to the print selection |
| Replace Selection | Replace the current print selection with sheets from checked revisions |
| Clear Selection | Remove all sheets from the current print selection |
| Open Print... | Apply changes and open Revit's Print dialog |
Deferred Apply
Changes you make (Add, Replace, Clear) are staged internally until you click "Apply" or "Open Print...". This lets you build up your selection without constantly updating Revit.
When you have unapplied changes, the dialog shows a yellow border and a notice bar indicating changes are pending. Click "Apply" to commit changes to Revit's print queue, or close the dialog to discard them.
Selection Counter
As you check revisions, the selection counter shows how many unique sheets are currently selected. If sheets appear in multiple checked revisions, an overlap indicator shows the overlap count.
If no revisions are selected and you click "Add to Selection", you'll be offered the option to add all sheets in the project.
Schedule Integration
Pull sheets directly from any sheet schedule in your project. This is perfect when you have a schedule already filtered for a specific submittal package.
 The Add from Sheet Schedule expandable section
How to Use
- 01Expand the "Add from Sheet Schedule" section
- 02Select a schedule from the dropdown (shows all schedules with sheet data)
- 03Select the column containing sheet numbers (auto-detected when possible)
- 04Click "Add to Selection" to add matching sheets to your print selection
The match count shows how many sheets were found. If a sheet number in the schedule doesn't exist as a printable sheet, it's skipped.
Parameter Filtering
Filter and add sheets based on any parameter value. Great for selecting sheets by discipline, phase, area, or any custom parameter you've set up.
 Filter by Parameter lets you select sheets by any parameter value
How to Use
- 01Expand the "Filter by Parameter" section
- 02Select a parameter from the dropdown
- 03Select a value. The dropdown shows all unique values with sheet counts (e.g., "Mechanical (42)")
- 04Click "Add to Selection" to add all sheets with that parameter value
Supported Parameters
The parameter list includes:
- All built-in sheet parameters (Sheet Number, Sheet Name, Drawn By, etc.)
- All project parameters applied to sheets
- Shared parameters on sheets
Parameters with no values across any sheets are hidden by default. Enable "Show empty parameters" in settings to see them.
Saved Selection Sets
Save your current sheet selection for quick reuse. Sets are stored by sheet number, so they work across Revit sessions. Your last session is automatically saved and restored when you reopen the dialog.
Configuration Controls
| Control | Description |
|---|---|
| Dropdown | Shows "Current Session" or your saved configurations. Select a configuration to load it. |
| Save | Saves changes to the currently selected configuration. If on "Current Session", opens Save As dialog. |
| Menu (▾) | Save As (create new), Rename, or Delete the current configuration. |
Saving a Configuration
- 01Build your sheet selection using any method (revisions, schedules, parameters)
- 02Click the menu (▾) button and choose "Save As..."
- 03Enter a descriptive name (e.g., "Permit Package", "ASI-012 Response")
- 04Click OK. The configuration is now selected in the dropdown
Loading a Configuration
- 01Click the configuration dropdown
- 02Select the saved configuration you want to load
- 03The sheets are loaded into your current selection
Deleting a Configuration
- 01Click the menu (▾) button
- 02Select "Delete"
Session Persistence
Your selection is automatically saved when you close the dialog and restored when you reopen it. You don't need to manually save to preserve your work between sessions.
Configurations are stored in %AppData%\Pixeltools\PlotByRevision\PlotByRevision.json and are organized by project.
Settings
Settings are saved automatically as you use the plugin. Sort options are available at the bottom of the dialog.
 Sort parameter and direction controls
Saved Preferences
| Setting | Description |
|---|---|
| Sort Parameter | Which parameter to sort sheets by (default: Sheet Number) |
| Sort Direction | Ascending or descending order |
| Filter Mode | Simple wildcards or Regex |
| Revision Filter Mode | All, Clouds Only, or Manual Only |
| Window Size | Dialog dimensions are remembered |
| Hide Empty Parameters | Whether to show parameters with no values |
| Column Widths | Saved column widths for Selected Sheets view |
| Column Order | Saved column display order (drag headers to reorder) |
| Custom Columns | Custom parameter columns added via gear menu |
| Language | Interface language (auto-detected from Revit, or set manually in About dialog) |
Supported Languages
Plot by Revision is available in 9 languages:
- English
- German (Deutsch)
- Spanish (Espanol)
- French (Francais)
- Italian (Italiano)
- Portuguese (Brazil)
- Japanese
- Korean
- Chinese (Simplified)
The language is automatically detected from your Revit installation. You can also manually select a language in the About dialog (click the info icon).
Settings are stored in %AppData%\Pixeltools\PlotByRevision\PlotByRevision.json
Keyboard Shortcuts
| Shortcut | Action |
|---|---|
| Ctrl + F | Focus the text filter box |
| Escape | Clear text filter / Close dialog |
| Enter | Add selected revision sheets to print selection |
| Ctrl + A | Select all revisions |
| Space | Toggle checkbox on focused revision |
| Ctrl + Double-Click | Auto-size all columns to fit content (on column header) |
Frequently Asked Questions
Why don't I see any revisions?
Revisions only appear if they have at least one sheet with that revision. Check that your sheets have revisions assigned and that the sheets are printable (not placeholder sheets).
Can I use this with Print Order Control?
Yes. They work great together. Use Plot by Revision to select your sheets, then use Print Order Control to arrange the print order. Print Order Control even has a button to launch Plot by Revision directly.
Does this modify my View/Sheet Sets?
No. Plot by Revision only works with the in-session print selection. It never creates, modifies, or deletes any saved View/Sheet Sets in your project.
Why is a sheet missing from the count?
Sheets must be printable to appear. Placeholder sheets and sheets that can't be printed are excluded. Also check your Revision Filter Mode. "Clouds Only" excludes manually-activated revisions.
How do I clear my print selection?
Click "Clear Selection" to remove all sheets from the current print selection.
Can I add ALL sheets at once?
Yes. If no revisions are selected and you click "Add to Selection", a prompt will ask if you want to add all sheets in the project.