Getting Started
Opening the Plugin
Find Print Order Control on the Add-Ins tab in Revit's ribbon. Click to open.
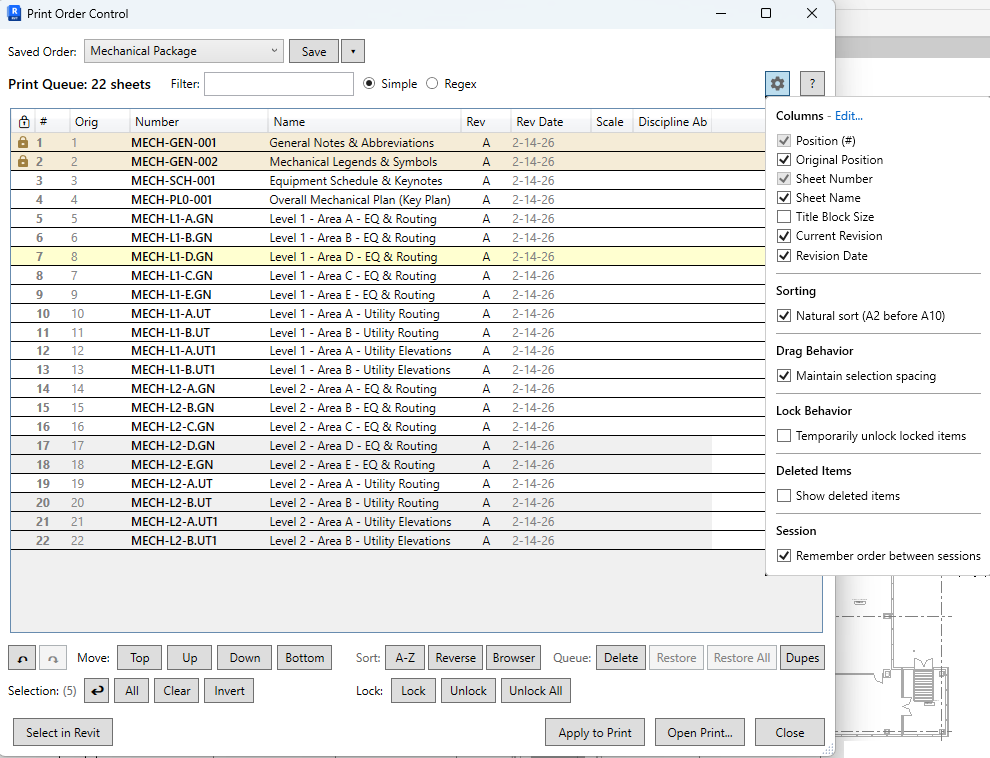 The Print Order Control dialog showing the full interface
Interface Overview
The dialog is organized into several areas:
- Filter bar (top): Quick text search to find sheets
- Toolbar: Undo/redo, sorting, locking, and utility buttons
- Sheet list (center): Your print queue with drag-and-drop reordering
- Saved orders: Save and load named print configurations
- Apply bar (bottom): Apply changes and open Print dialog
Prerequisites
Before opening Print Order Control, you need sheets in your print selection. Use one of these methods:
- File > Print > Selected views/sheets: Revit's built-in sheet picker
- Plot by Revision: Our companion plugin for revision-based selection
- Load a saved order: Restore a previously saved configuration
Basic Workflow
- 01Arrange sheets: Drag and drop to reorder, or use sort buttons
- 02Lock critical positions: Ensure cover sheets stay at the top
- 03Save your order: Create a named configuration for reuse
- 04Apply & Print: Click "Apply to Print" then "Open Print..." to send to Revit
Print Order Control remembers your last session automatically. Close Revit, come back tomorrow, and your order is still there.
Filtering
Use the filter bar at the top to quickly find sheets by number or name.
 Type to filter the sheet list
Filter Modes
| Mode | Description | Examples |
|---|---|---|
| Simple | Wildcard matching with * and ? | A-1*, *Floor*, M-?01 |
| Regex | Full regular expression support | ^A\d{3}, (Floor|Ceiling) |
Wildcards (Simple Mode)
*: Matches any number of characters?: Matches exactly one character
Quick Tips
- Press Ctrl+F to focus the filter box
- Press Escape to clear the filter
- Click the X button to clear the filter text
Filtering doesn't remove sheets from your queue. It just hides non-matching sheets temporarily.
Reordering Sheets
Drag and Drop
- 01Click a sheet to select it
- 02Drag it to the desired position
- 03A visual indicator shows where the sheet will be inserted
- 04Release to drop
Moving Multiple Sheets
- 01Select multiple sheets using Ctrl+Click or Shift+Click
- 02Drag any selected sheet. All selected sheets move together
- 03Drop at the target position
Move Buttons
Use the toolbar buttons or keyboard shortcuts to move selected sheets:
 Move buttons for precise positioning
| Action | Shortcut |
|---|---|
| Move up one position | Ctrl+Up |
| Move down one position | Ctrl+Down |
| Move to top | Ctrl+Home |
| Move to bottom | Ctrl+End |
Maintain Selection Spacing
Enable "Maintain selection spacing" in settings to preserve gaps between selected items when dragging. Useful when your selection has intentional spacing.
Locked items cannot be dragged unless "Temporarily unlock" is enabled in settings.
Locking Positions
Lock sheets to prevent them from moving during sort operations. Perfect for cover sheets, title pages, or any sheet that must stay in a specific position.
 Lock controls to fix sheet positions
Lock States
| State | Appearance | Behavior |
|---|---|---|
| Unlocked | Normal row | Can be moved, sorted, reordered |
| Locked | Bronze/tan background with lock icon | Cannot be moved; stays in place during sorts |
| Locked + Temp Unlock | Green background with lock icon | Can be moved but remains marked as locked |
How to Lock/Unlock
- Lock selected: Select sheets, click "Lock" or press Ctrl+L
- Unlock selected: Select sheets, click "Unlock"
- Unlock all: Click "Unlock All"
- Right-click menu: Lock/Unlock options available in context menu
Temporarily Unlock
Enable "Temporarily unlock locked items" in the settings popup (gear icon) to allow moving locked items while keeping them marked as locked. The row appears green to indicate this state.
Sorting
Quickly sort your sheet list using the toolbar buttons or column headers.
Quick Sort Buttons
 Quick sort buttons for common operations
| Button | Action |
|---|---|
| A-Z | Sort by sheet number (ascending) |
| Reverse | Reverse the current order |
| Browser | Match Project Browser sheet organization |
Column Header Sorting
Click any column header to sort by that column. Advanced sorting options:
- Click: Toggle sort direction (ascending/descending)
- Ctrl+Click: Add to multi-column sort
- Alt+Click: Remove from sort
- Shift+Click: Clear this column's sort
Natural Sort
Enable "Natural sort" in settings so "A2" sorts before "A10". When disabled, strict alphabetical order is used.
Locked items stay in place during all sort operations. Other items sort around them.
Saved Orders
Save named print orders per project. Each project can have multiple saved configurations like "Full CD Set", "Permit Package", or "ASI-012 Response".
 Save, load, and manage named print orders
Saving an Order
- 01Arrange your sheets in the desired order
- 02Click "Save" next to the Saved Order dropdown
- 03If this is a new order, you'll be prompted for a name
- 04Existing orders are updated in place
Save As (New Name)
- 01Click the "▾" menu button next to Save
- 02Select "Save As..."
- 03Enter a new name
Loading an Order
- 01Select an order from the "Saved Order" dropdown
- 02The sheets are reordered to match the saved configuration
- 03Sheets not in the saved order are placed at the end
Deleting an Order
- 01Select the order to delete from the dropdown
- 02Click the "▾" menu button
- 03Select "Delete"
Saved orders are stored per-project in %AppData%\Pixeltools\PrintOrderControl\
Export & Import
Share print orders across projects, teams, or even different software. Export your sheet list to a file, or import sheet numbers from any text file.
Exporting
- 01Arrange your sheets in the desired order
- 02Click File in the menu bar, then Export...
- 03Choose a format: CSV, TXT, or JSON
- 04Select what to include: sheet numbers, names, positions, etc.
- 05Save the file
Export Formats
| Format | Best For |
|---|---|
| CSV | Opening in Excel, sharing with other teams, data analysis |
| TXT | Simple sheet number lists, email/chat sharing |
| JSON | Programmatic use, full data preservation, automation scripts |
Importing
- 01Click File in the menu bar, then Import...
- 02Select a file containing sheet numbers (one per line, or CSV format)
- 03The import will match sheet numbers to sheets in your current project
- 04Matched sheets are added to your queue in the order listed
Import works with any plain text file that has sheet numbers. You can paste a list from Excel, copy from an email, or use output from other software.
Use Cases
- Team coordination: Export your print order and share with a colleague
- Cross-project reuse: Export a standard order, import into another project
- External submittal lists: Import sheet numbers from contractor requests
- Backup: Keep a record of print orders outside Revit
Column Configuration
Built-in Columns
| Column | Description | Default |
|---|---|---|
| # (Position) | Current position in print order | Always shown |
| Orig | Original position when dialog opened | Hidden |
| Number | Sheet number | Always shown |
| Name | Sheet name/title | Shown |
| Rev | Current revision mark | Hidden |
| Rev Date | Current revision date | Hidden |
| Size | Title block size | Hidden |
Showing/Hiding Columns
- 01Click the gear icon in the header bar
- 02Check or uncheck columns in the "Columns" section
- 03Changes apply immediately
Custom Parameter Columns
- 01Click the gear icon, then "Edit..." next to Columns
- 02Click "Add Parameter Column..." to select parameters
- 03Use the Up/Down arrows to reorder columns
- 04Toggle visibility with checkboxes
Column Width & Order
- Resize columns by dragging the column borders
- Reorder columns by dragging column headers
- Both widths and order are saved between sessions
- Ctrl+Double-Click any column header to auto-size all columns
 Reorder columns, toggle visibility, and add custom parameter columns
Delete & Restore
Remove sheets from the print queue without losing them permanently. Deleted sheets can be restored at any time.
 Delete and restore controls
Deleting Sheets
- Select sheets and click "Delete"
- Or press the Delete key
- Or right-click and choose "Delete from Queue"
Viewing Deleted Sheets
- 01Click the gear icon
- 02Enable "Show deleted items"
- 03Deleted sheets appear grayed out and italicized
Restoring Sheets
- Restore selected: Select deleted sheets, click "Restore" or press Ctrl+H
- Restore all: Click "Restore All"
Applying Changes
When you're ready to print, use the buttons at the bottom of the dialog to apply your changes to Revit.
 Apply your changes and open Revit's Print dialog
| Button | Action |
|---|---|
| Apply to Print | Save the current order to Revit's print selection (doesn't open Print dialog) |
| Open Print... | Apply changes and open Revit's Print dialog |
 Queue status shows current sheet count
Changes are not saved to Revit until you click "Apply to Print" or "Open Print...". A yellow banner reminds you when you have unapplied changes.
Settings
Access settings via the gear icon in the toolbar.
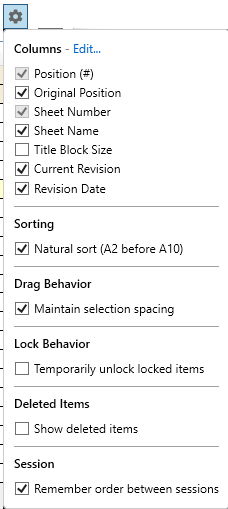 Settings popup accessed via the gear icon
Column Settings
- Position (#): Always shown
- Original Position: Show position when dialog first opened
- Sheet Number: Always shown
- Sheet Name: Show/hide name column
- Current Revision: Show revision mark
- Revision Date: Show revision date
- Title Block Size: Show sheet size
Behavior Settings
| Setting | Description |
|---|---|
| Natural sort | A2 sorts before A10 (vs strict alphabetical) |
| Maintain selection spacing | Preserve gaps between selected items when dragging |
| Temporarily unlock locked items | Allow moving locked items while keeping them marked as locked |
| Show deleted items | Display items removed from queue (grayed out) |
| Remember order between sessions | Auto-save/restore sheet order per project |
| Filter mode | Simple (wildcards) or Regex filtering |
Supported Languages
Print Order Control is available in 9 languages:
- English
- German (Deutsch)
- Spanish (Espanol)
- French (Francais)
- Italian (Italiano)
- Portuguese (Brazil)
- Japanese
- Korean
- Chinese (Simplified)
The language is automatically detected from your Revit installation. You can also manually select a language in the About dialog (click the info icon).
Settings are stored in %AppData%\Pixeltools\PrintOrderControl\PrintOrderControl.json
Keyboard Shortcuts
 Undo and Redo buttons in the toolbar
Movement
| Shortcut | Action |
|---|---|
| Ctrl+Up | Move selection up |
| Ctrl+Down | Move selection down |
| Ctrl+Home | Move to top |
| Ctrl+End | Move to bottom |
Editing
| Shortcut | Action |
|---|---|
| Ctrl+Z | Undo |
| Ctrl+Y | Redo |
| Ctrl+L | Lock/unlock selection |
| Ctrl+S | Save configuration |
| Delete | Delete from queue |
| Ctrl+H | Restore deleted |
Selection
| Shortcut | Action |
|---|---|
| Ctrl+A | Select all |
| Ctrl+Click | Add/remove from selection |
| Shift+Click | Range select |
| Escape | Clear selection |
Sorting & Navigation
| Shortcut | Action |
|---|---|
| Ctrl+R | Reverse order |
| Ctrl+B | Match Browser order |
| Ctrl+F | Focus filter box |
| Ctrl+Double-Click | Auto-size all columns (on column header) |
Frequently Asked Questions
Why is the window empty?
You need sheets in your print selection first. Use File > Print > Selected views/sheets, or use Plot by Revision to select sheets.
My changes aren't showing in Print
Click "Apply to Print" before opening the Print dialog. The yellow banner at the bottom reminds you when changes haven't been applied.
How do I use this with Plot by Revision?
If Plot by Revision is installed, you'll see a "Plot by Revision..." button in Print Order Control. Click it to open Plot by Revision, select your sheets there, then return to arrange the order.
 Integration button to launch Plot by Revision
Can I undo after closing the dialog?
No, undo history is cleared when you close the dialog. However, if "Remember order between sessions" is enabled, your last order is saved and can be restored.
Why can't I drag a locked sheet?
Locked sheets are immovable by default. Enable "Temporarily unlock locked items" in settings to allow moving them while keeping them marked as locked.
How many undo levels are supported?
Up to 50 undo/redo operations are remembered per session.
What happens to sheets not in a saved order?
When loading a saved order, sheets that weren't part of that order are placed at the end of the list in their current order.